Setting Easy Goals & Deadlines With Scrivener Targets
Setting goals and deadlines for your work can be instrumental in helping you achieve your dreams.
But holding yourself accountable to these targets is often easier said than done. If like me, you’re someone who often lacks the internal drive to sit down and make words happen, you may need a little extra accountability to keep you on track. And for me, nothing works better than utilizing Scrivener’s built-in target feature.
What exactly can this feature help you accomplish? And how can you begin making use of Scrivener Targets today? Let’s take a look in today’s video lesson and transcript, which are excerpted from Storytelling With Scrivener — our full-length tutorial course designed specifically to help you harness the power of this epic app for writers.
(Note: This course is retired as of January 2024.)
(Note: This video lesson uses Scrivener 3 for Mac. Features & interface details may vary if you’re using a different version.)
Do you love setting goals and deadlines to keep yourself on track as you write? This is the video for you, my friend. In this lesson, we’re going to break down everything you need to know about making use of Project and Document Targets, beginning with how to access them.
#1: Opening Document Targets
Let’s say you want to draft a chapter that is 1,000 words long, and you’d like to do a better job of keeping yourself on track. To do so, select your chapter’s document in your Binder, and, in the Editor window, select the Targets icon in this bottom right-hand corner. This opens your Document Targets window.
In this window, you can first set your target word count for this document. If you’d like, you can toggle this target count to operate off of characters instead of words using this dropdown menu.

Before we go any further, let’s press “okay” to exit out of this window. You’ll notice now that in place of the Document Targets icon, you have a progress bar which shows your progress as you work to reach your target. If you’re far from your word count, the bar will appear blue.
As you write more, the bar will begin to fill and will turn green when you’ve reached your target. To alter your Target, simply click on this icon once again.
#2: Setting a Minimum Goals for Your Document
The next option in your Document Target window allows you to set a minimum goal for your document.
You may estimate that 1,000 words will be the right amount for this chapter, but if less may do, you may want to set a minimum goal of, say, 800 words. Selecting “okay” once again, you’ll notice that your progress bar now includes a small line indicating the 800-word mark.

The bar is also now red as it fills up. Once you reach the 800-word mark, the bar will turn blue, then green once you’ve hit 1,000 words or more.
#3: Introducing an Overrun Allowance
Opening up our Document Target window once again, you can now set an overrun allowance. This is the maximum number of words that you’d like to write for your document. For example, if you set your overrun allowance at 200 words, then the maximum number you’d like to write for your chapter is 1,200 words.
If you select the Show Overrun option and then select “okay,” your progress bar will turn red once you’ve gone over your limit of 1,200 words. If you select the “Show Allowance in Progress Bar” option, a second line in your progress bar will appear to indicate the point at which you’ve gone over your maximum word count allowance.

And finally, if you select “Show Target Notifications”, you will receive push notifications about your target on your computer, which I believe is a Mac-only feature.
One final thing to note before we move onto Project Targets is that in setting Document Targets, you’ll now notice the word count in your Editor footer indicates how many words out of your word count target you’ve written.
#4: Accessing Project Targets
Now let’s talk about setting targets for your project as a whole. I make use of this particular feature all the time!
To open the Project Targets window, you can head up to the Project tab in your top navigation bar and select Show Project Targets or you can customize your Toolbar to include the Project Target shortcut, which I often do. To learn how to customize your Toolbar, check out the Toolbar lesson in this section of our course.

With your Project Target window open, you now have a few options. Firstly, you see there are two progress bars. The first indicates your progress on your draft overall, while the second indicates your progress on your current day’s session.
#5: Setting Project & Session Goals
To set a target for your draft, simply use this dropdown menu to decide whether you want to set a word count, character, or page count target, then click to type your preferred target in this text box. You’ll notice that your Target bar appears blue until you’ve reached your goal, at which point it will turn green.
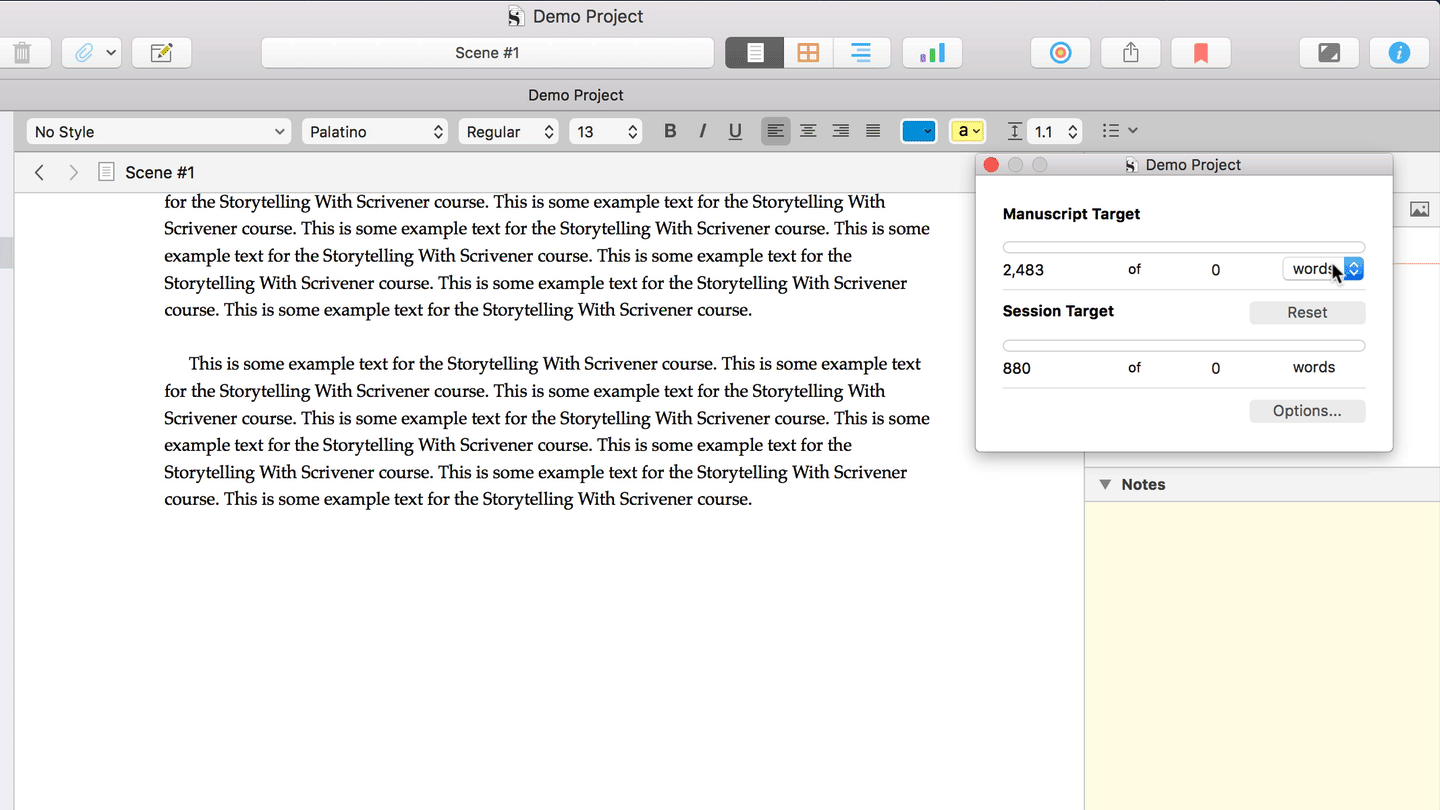
You can use the same method to manually set a target goal for your current day’s writing session. But what if you’d like to set yourself a deadline and know exactly how many words you need to write that session to keep on track toward achieving your total draft target on time?
This is when you want to click the “options” button.
#6: Creating A Deadline for Your Project
As you can see, a new window has appeared. In the Draft Target tab, you can firstly tell the Target window whether you want it to count only the current compile group and only documents set to be included in Compile toward your draft progress.
I usually check both of these boxes as I always include all of my manuscript documents in compile while excluding all of my notes and research. This tells my Target window to only count words that I write in chapters and scenes toward my total target goal.

Moving right along, you can next set an overrun allowance in exactly the same way we did in our document targets earlier in this video. Below this, however, you can set a deadline for your draft target. So if you’d like to finish your current draft by the end of the month or the end of the year, etc, select this checkbox and adjust the date as necessary.
Checking “Show Target Notifications” down below will again tell Scrivener to send you push notifications concerning your project targets and deadline.
#7: Customizing Your Project Deadline Settings
Switching over to the Sessions Target tab, let’s take a look at a few more options. Firstly, you can tell Scrivener when to reset your session count. Do you want Scrivener to consider the end of one session and the beginning of another to be at a certain time? Then make use of this dropdown menu.
I usually set my sessions to rest at midnight or simply select the “On Next Day Opened” option, depending on how frequently I intend to work on that specific project.

Selecting the “count text written anywhere in the project” checkbox will indicate that any text written in notes, research, and beyond will lend to your session target progress. I typically leave this unchecked, as I only want to count words written in my actual chapters and scenes.
“Allowing Negatives” is something I usually check, however, as this subtracts words from your session target when you backspace or delete. I personally think this is important for being honest with myself about how much I’m writing toward my goals, though allowing negatives may not be the right choice for you.
Selecting “automatically calculate from draft deadline” is also very helpful. Checking this will tell Scrivener to automatically indicate how much you need to write each session in order to stay on track toward finishing your draft target by the deadline you’ve set.
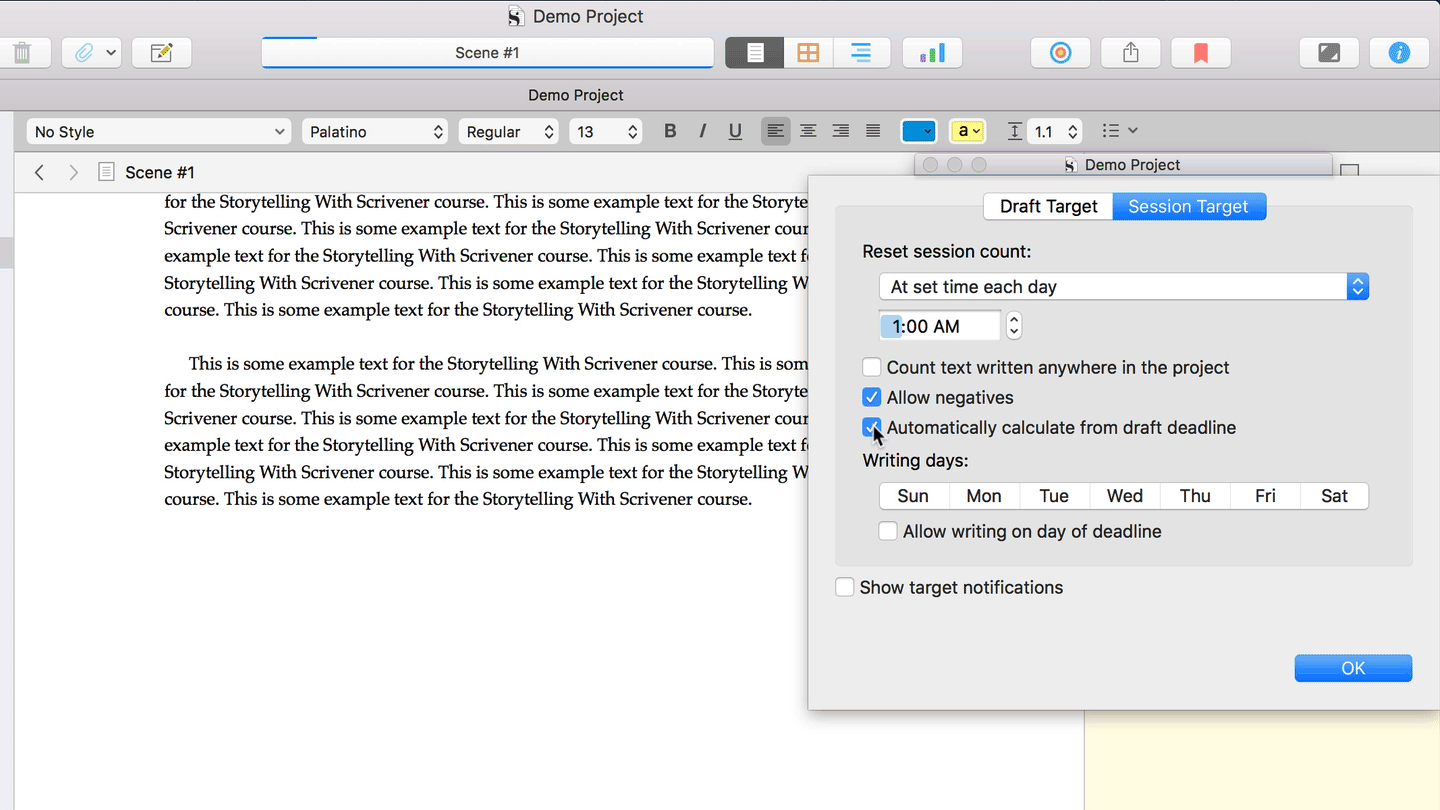
If you do check this option, you can tell Scrivener whether to only count certain days as writing days and whether or not to allow writing on the day of your deadline, helping it provide you with a far more accurate Session Target goal.
Selecting “okay” will, of course, save these options and take you back to your Project Targets window, where you can see how well your draft and session are coming along now that you’ve tailored Project Targets to your needs.
In this window, you can select “reset” to reset a Session Target back to zero. You cannot undo this, however, so be mindful when resetting your session.
#8: Monitoring Your Goal & Deadline Progress
Finally, if you hover over the Quick Search and Targets icon in your default Toolbar, you’ll notice that it now shows how many words you’ve written total for your project out of your total Draft Target goal, as well as how many words you’ve written that day for your session.

The blue line above also indicates how close you are to completing your draft target. Pretty neat, right?
I love the accountability that these two features provide. I personally find targets and deadlines to provide the necessary healthy pressure I need to keep on writing, and I hope you’ll give them a try to see if they do so for you as well.
Ready to purchase Scrivener?
Scrivener is available for Mac and Windows users for a one-time fee of $59.99 USD or a one-time fee of $23.99 for iOS (ex: iPad, iPhone, iPod Touch). You can also take advantage of their amazing free trial, which doesn’t expire for 30 working days.
* These are affiliate links, meaning I’ll earn commission on sales made through these links at no extra cost to you. Thank you for supporting Well-Storied!