How to Import Your Research Into Scrivener

As novelists, we often do a lot of research, and keeping track of all that research?
Well, that can be a bit of a nightmare at times. Fortunately, Scrivener makes our lives a little easier with a few helpful options and features — specifically, the ability to import several different kinds of files and webpages into your Scrivener Project. Not sure how to get started?
Let's break down everything you need to know in today's video lesson and transcript, which is excerpted from our Storytelling With Scrivener video tutorial course. (Note: This course is retired as of January 2024.)
(Note: This video lesson uses Scrivener 3 for Mac. Features & interface details may vary if you’re using a different version.)
The first thing you need to know about importing files into Scrivener is that, with the exception of basic text files, all of your research must first be imported into the Research folder in your Binder before you can move it elsewhere in your project, if you so wish. Text files such as Word documents or Plain Text, however, can be imported directly into any folder in your Binder.
What kinds of files can Scrivener import? Many! You can add text documents, images, audio and video files, webpages, multi-markdown files, and even other Scrivener projects into your Research folder, among others.
#1: Importing Files From Your Computer
To begin importing, highlight the Research folder in your Binder, then head up to File > Import and take a look at the options in the pop-out menu. Selecting “Files” will allow you to import most any file from your computer, including the text documents, images, audio and video files, and so on we talked about a moment ago.
Simply ensure that the file is downloaded to your computer first, then use the import window to select and import the file into Scrivener.
#2: Importing Webpages
Your next option allows you to import webpages directly from the internet. To do so, first select Webpages in the File > Import menu, then type in the exact webpage you want to import in the text box that appears in the import window.
Make sure to type in the full and exact address of the webpage you’d like to import, otherwise Scrivener may not be able to process the request. I personally find it easier to just copy and paste the web address directly from the internet. You can then use the “Title” text box to choose what you’d like the Webpage document to be titled when it is imported into your Research folder.

Press “okay" and soon a document will appear containing your webpage. A couple things to note here:
Firstly, it may take a few moments for your webpage to import depending on how complex the webpage itself is. Any webpage that utilizes lots of graphics or videos may import slowly, and it’s possible that the formatting will be slightly skewed upon import as well.
Another thing to note is that importing a webpage imports the content as is. If the website updates the page, those updates will not appear in your Research folder. If you know you want to save a webpage that will be updated often, you can link to a webpage using References, which is a different feature we’ll discuss in another video lesson in our course.

You can also click and drag a webpage directly into your Research folder by clicking on the icon next to website’s address in your browser, then dragging that icon into your Scrivener Project window and on into the Research folder. Again, the webpage may take a minute to fully import and appear.
Heading back to our File > Import menu, you’ll next notice an option to Import Research Files as Aliases and to Import Plain Text Formatted Screenplays. These are options that I don’t think the vast majority of novelists will have reason to use, so we’ll skip them for now.
#3: Importing a Separate Scrivener Project
Moving right along, we next have the option to import an entirely separate Scrivener Project. Importing a Scrivener Project will import ALL of its documents and folder, including the Manuscript, Research, and Trash folders.

Once imported, the project as a whole will appear as a single folder in your Binder. You can then open and navigate this folder and all of its subfolders and documents as you would any other folder in your Binder.
#4: Importing Documents from Other Projects
It’s also worth mentioning that you can click and drag individual documents and folders from a separate Scrivener Project into your current project to import them. With two Scrivener Projects opened, simply click the document or folder you’d like to import into the other Project, then drag it into your new project window and drop it anywhere you’d like within your Binder. Ta-da!

#5: Importing Files From Your Finder
Similarly, you can also click and drag documents directly from your computer into the Scrivener Binder. Simply open up your Finder on Mac or the File Explorer on your PC, then click and drag. You can even do so directly from your desktop. Neat, right?

#6: Importing & Splitting Documents
Alright, this had been a lot of information, I know. But we still have one remaining Import option we need to discuss, and that is the Import And Split feature in your File > Import menu.
Using this option, you can import a single text file as multiple documents within your Binder. To do so, you’ll first want to find the text file you’d like to import on your computer and open it separately.
With the file open, decide where you’d like the file to split into multiple documents when imported into Scrivener, then place a unique symbol at this separation point. You can use a pound sign, an asterisk, whatever you’d like. Just make sure it isn’t a symbol that also appears elsewhere in your file at a place you would NOT want your file to split when imported.
When you’ve finished inputting the symbol that will separate your file into multiple, save and exit your file. Back in your Scrivener Project, head up to File > Import, and select the Import and Split Option.
In the window that appears, first highlight the file you’d like to import, then tell Scrivener what symbol you’ve input to mark the separation points in your file. If you don’t see the option to do so, click on the options button. You’re looking for the “Sections are separated by” text box.
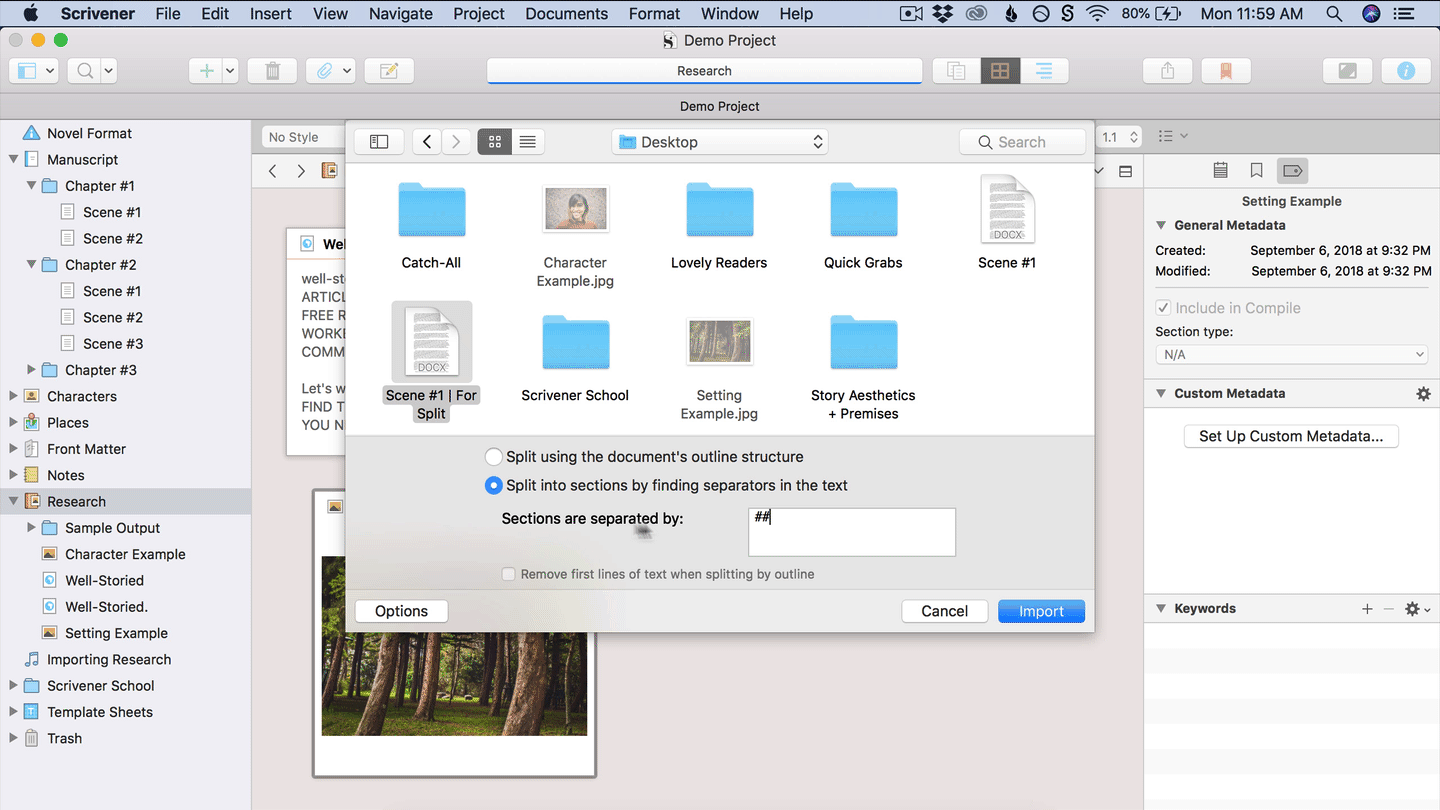
Type your symbol into this text box, then select the “Import” button to import and split your single document into several. You can then rename these imported documents as you see fit by double-clicking on the file names in your Binder.
Those are all of your major research import options in Scrivener, writers. Remember, the Research folder essentially works the same as any other folder in your Binder. You can always create new sub-folders and documents to better organize your research if desired.
Ready to purchase Scrivener?
IScrivener is available for Mac and Windows users for a one-time fee of $59.99 USD or a one-time fee of $23.99 for iOS (ex: iPad, iPhone, iPod Touch). You can also take advantage of their amazing free trial, which doesn’t expire for 30 working days.
* These are affiliate links, meaning I’ll earn commission on sales made through these links at no extra cost to you. Thank you for supporting Well-Storied!